Elasticsearch設定
exemONE Elasticsearchインストールおよび設定ガイド
exemONEにおいて、Elasticsearchはログデータストレージと外部リソースモニタリング対象として使用されます。以下にインストールから設定までを段階的に説明します。
1. Elasticsearchインストール(Binaryモード)
サポート環境
- OS: Linux環境
- 権限: root権限が必要(一部設定時)
- 構成: シングルノード設定基準
- Elasticsearchバージョン: 8系以上必須
手順1: インストールファイルの準備
# Elasticsearchダウンロード (例: 8.0.1バージョン)
wget https://artifacts.elastic.co/downloads/elasticsearch/elasticsearch-8.0.1-linux-x86_64.tar.gz
手順2: 解凍およびディレクトリの作成
# 解凍
tar -xzf elasticsearch-8.0.1-linux-x86_64.tar.gz

# データ/ログディレクトリ作成
mkdir -p /home/exemone/elasticsearch/data
mkdir -p /home/exemone/elasticsearch/logs

# (選択事項) ディレクトリ権限変更
sudo chown -R some_group:some_user /opt/elasticsearch-8.0.1
手順3: JVMオプションの設定
config/jvm.options.d/heap_gc.options ファイルを作成します:
cd elasticsearch-8.0.1/config/jvm.options.d
touch heap_gc.options
以下の内容を記述します:
# ヒープメモリ設定: 使用可能な物理メモリの半分を使用します
# (変更必要) 使用可能メモリが32gbなら16g設定
-Xms16g
-Xmx16g

# G1 GC使用
-XX:+UseG1GC

# JVM初期ヒープ占有(pre-touch)
-XX:+AlwaysPreTouch

# G1 GCチューニング
-XX:InitiatingHeapOccupancyPercent=75
-XX:G1ReservePercent=25
-XX:MaxGCPauseMillis=200
-XX:G1HeapRegionSize=16m

# GCロギング
# (変更必要) <logsディレクトリパス>を実際のパスに変更
-Xlog:gc*,gc+age=trace,safepoint:file=/home/exemone/elasticsearch/logs/gc.log:utctime,pid,tags:filecount=32,filesize=64m

# メモリロック (bootstrap.memory_lock: trueと一緒に使用)
-XX:+UnlockExperimentalVMOptions
-XX:+DisableExplicitGC
手順4: elasticsearch.ymlの設定
cluster.name: exemone-cluster
node.name: node-1                    # (変更必要) ノードごとに異なる設定
node.roles: [ master, data, ingest ]

# (変更必要) 物理サーバーIP
network.host: 10.10.xx.xxx
http.port: 9200
transport.port: 9300

# (変更必要) 先ほど作成したディレクトリパス
path.data: /home/exemone/elasticsearch/data
path.logs: /home/exemone/elasticsearch/logs

# 単一ノード設定時
discovery.type: single-node

# systemd登録時にコメント解除 (optional)
# bootstrap.memory_lock: true

# https無効化
xpack.security.enabled: false
xpack.security.http.ssl.enabled: false
xpack.security.transport.ssl.enabled: false

# https使用時 (上記3行の代わりに下記を使用)
# xpack.security.enabled: true
# xpack.security.transport.ssl.enabled: true
# xpack.security.http.ssl.enabled: true
手順5: OSカーネルパラメータの変更
sudo権限が必要です:
sudo vi /etc/sysctl.conf

# 追加
vm.max_map_count=262144

# 適用および確認
sudo sysctl --system
手順6: Elasticsearchの実行
ES_HOME="/home/exemone/elasticsearch-8.0.1" ES_PATH_CONF="/home/exemone/elasticsearch-8.0.1/config" ./home/exemone/elasticsearch-8.0.1/bin/elasticsearch
2. exemONEモジュールでのElasticsearch連携設定
Elasticsearchインストール後、exemONE収集モジュールと連携する必要があります。
適用最小バージョン
| モジュール | 最小バージョン |
|---|---|
| exemone-api | v3.0.506.15.50 |
| exemone-ingester | v3.0.506.15.29 |
| exemone-host-agent | 3.0.25.1 |
| exemone-k8s-agent | 3.0.11.1 |
| exemone-container-agent | 3.0.6 |
手順1: PostgreSQLでElasticsearchログ有効化クエリを実行
exemONE Repository DB(PostgreSQL)で以下のクエリを実行します:
insert into xm_global_properties (props_id, name, value)
(
    select uuid_generate_v4() as props_id, 'useESLog' as name, 'true' as value
    where not exists (
        select 1 from xm_global_properties where "name" = 'useESLog'
    )
);
手順2: exemone-apiの設定
修正ファイル: {EXEM_HOME}/containers/exemone-api/configs/application.yml
spring の下に elasticsearch の内容を追加します:
  elasticsearch:
    username:
    password:
    hostname: 10.20.30.40    # (変更必要) Elasticsearch IP
    port: 9200
    connection-timeout: 30000
    enable: true
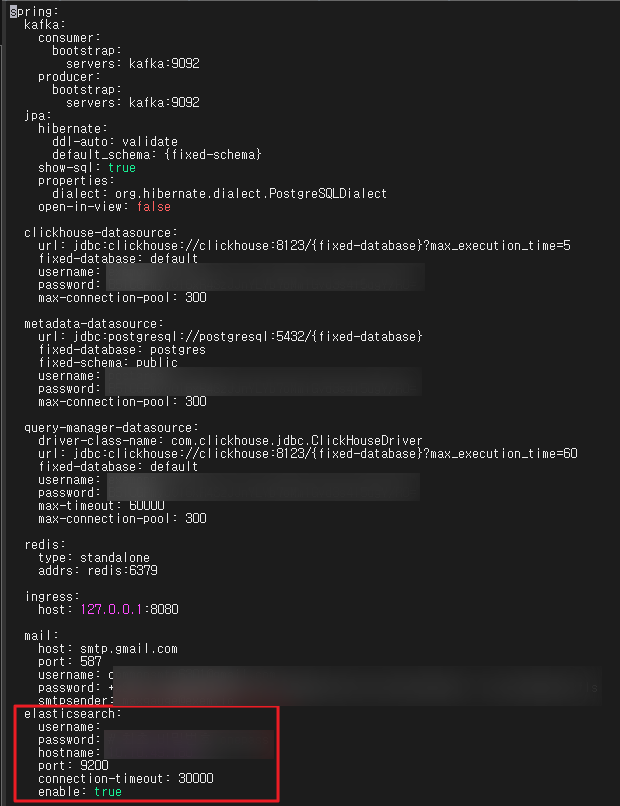
APIの再起動:
$ {EXEM_HOME}/scripts/restart api
手順3: exemone-ingesterの設定
修正ファイル: {EXEM_HOME}/containers/exemone-ingester/configs/ingester.yaml
global の下に elasticsearch の内容を追加します:
  elasticsearch:
    enabled: true
    addresses:
      - http://10.20.30.40:9200    # (変更必要) Elasticsearchアドレス
    username:
    password:
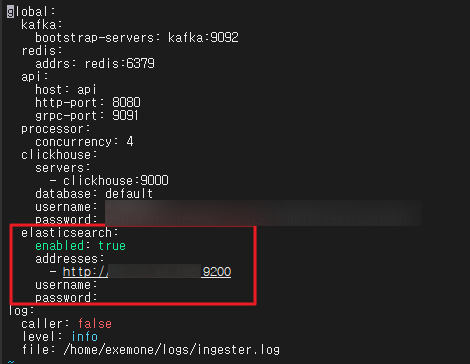
Ingesterの再起動:
$ {EXEM_HOME}/scripts/restart ingester
3. Elasticsearch タイムアウトオプションの設定
ネットワーク遅延や大容量クエリ処理時のタイムアウトエラーを防ぐために、オプションを調整できます。
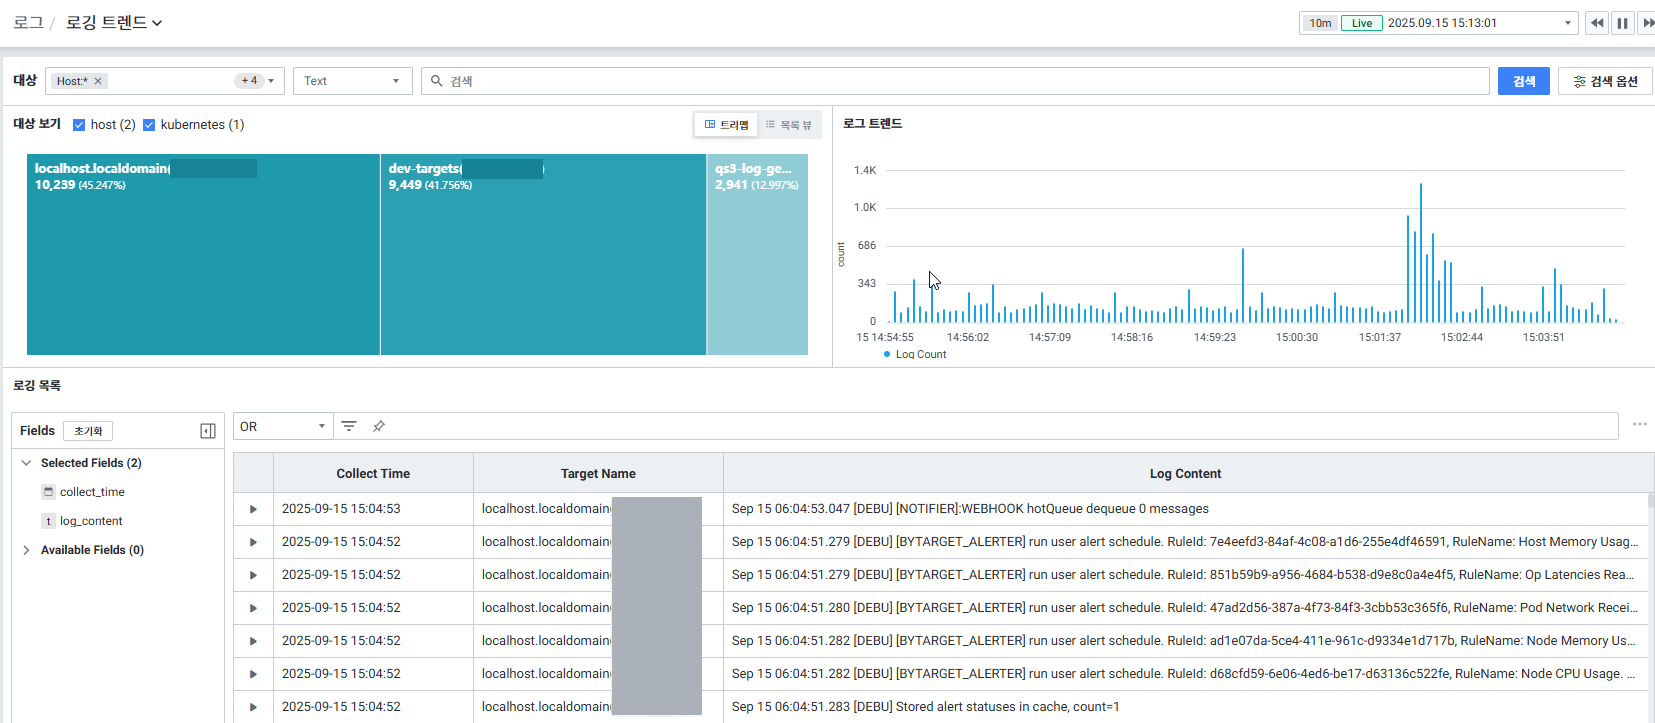
修正ファイル: {EXEM_HOME}/containers/exemone-api/configs/application.yml
elasticsearch:
  host: localhost
  port: 9200

  timeout:
    connection-timeout: 10000        # 接続タイムアウト (デフォルト5秒, 例: 10秒)
    socket-timeout: 60000           # 応答タイムアウト (デフォルト30秒, 例: 60秒)
    connection-request-timeout: 5000 # コネクションプール待機タイムアウト (デフォルト2秒, 例: 5秒)
| オプション | デフォルト値 | 用途 |
|---|---|---|
| connection-timeout | 5000ms (5秒) | サーバーへの最初の接続試行時の最大待機時間 |
| socket-timeout | 30000ms (30秒) | クエリリクエスト後のサーバー応答待機の最大時間 |
| connection-request-timeout | 2000ms (2秒) | コネクションプール不足時の新規コネクション待機時間 |
設定後、APIを再起動:
{EXEM_HOME}/scripts/restart api
4. exemONE UIでのログ収集Path設定
手順1: Pathの設定
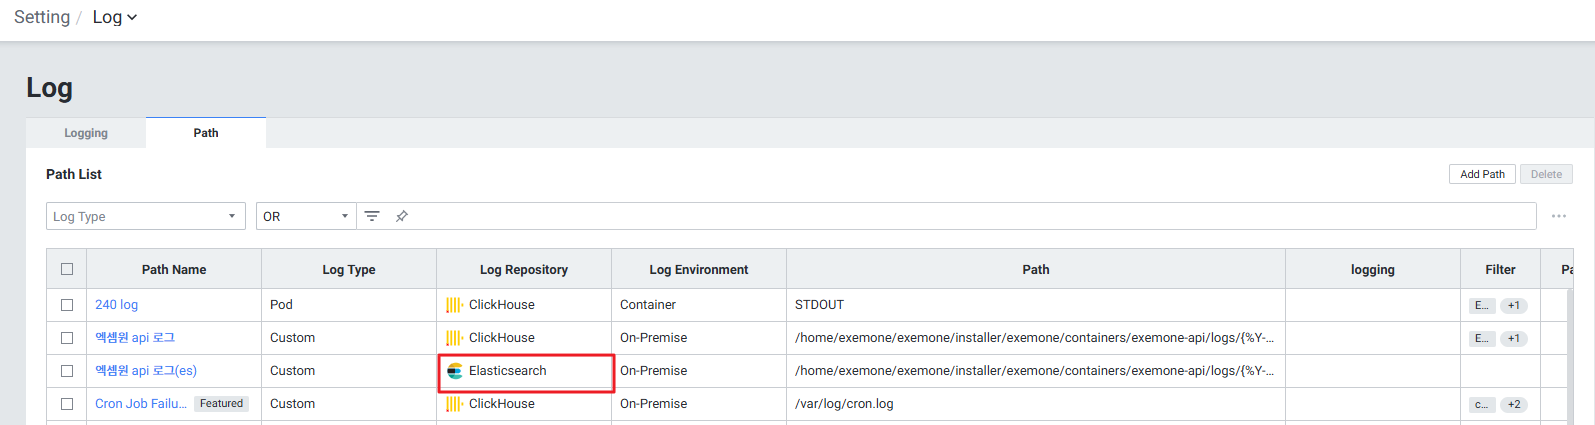
Setting > Log > Path メニューで:
- Add/Edit Path >
Log Repository > Elasticsearchを選択 - Elasticsearchにログを保存する場合、キーワードフィルターなしですべてのデータを保存します
- Exclude Filter Key を適用してログを除外できます
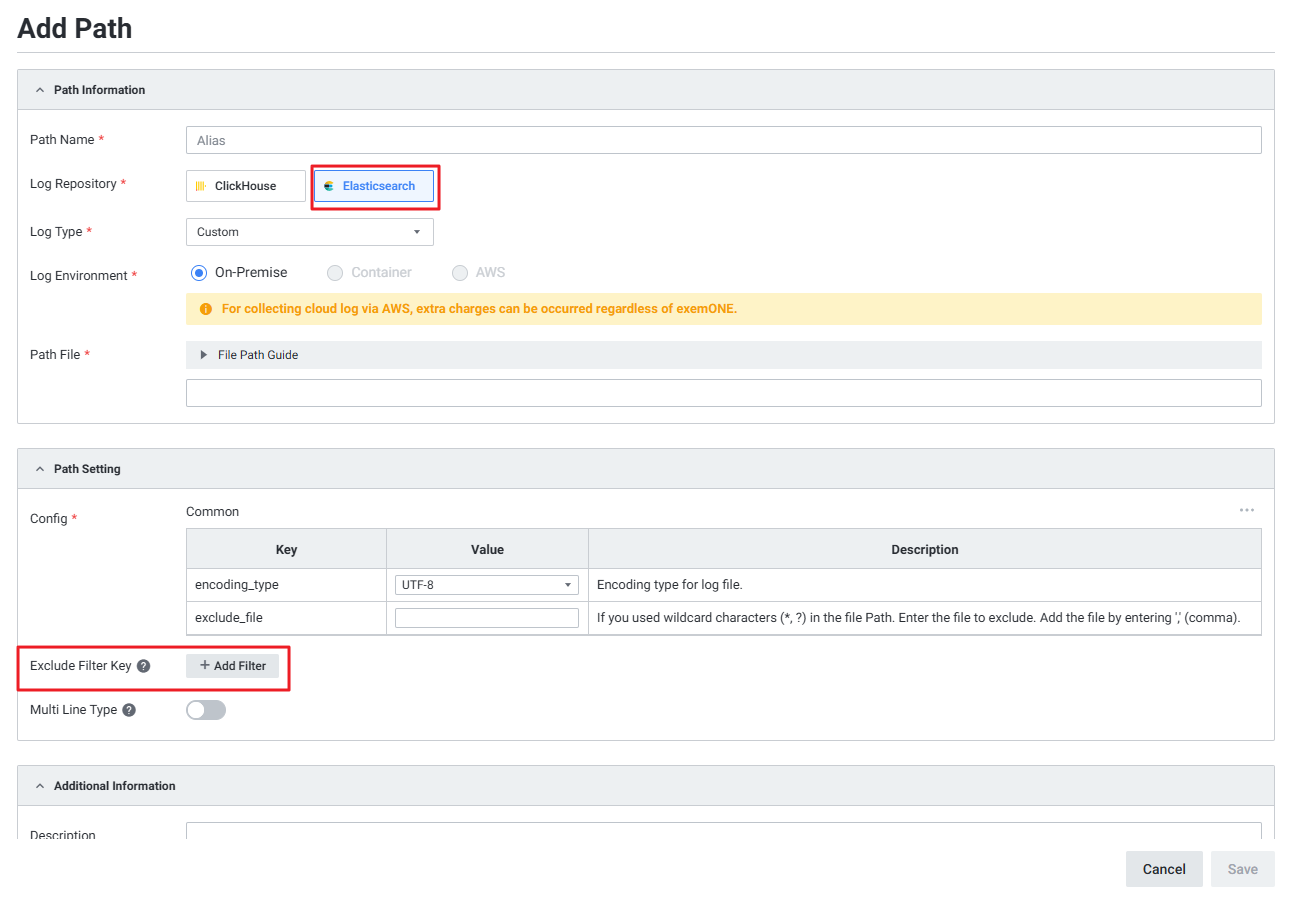
Path Listでは、Log Repository情報によってElasticsearchとClickhouseのストレージを区別します:
手順2: Loggingの設定
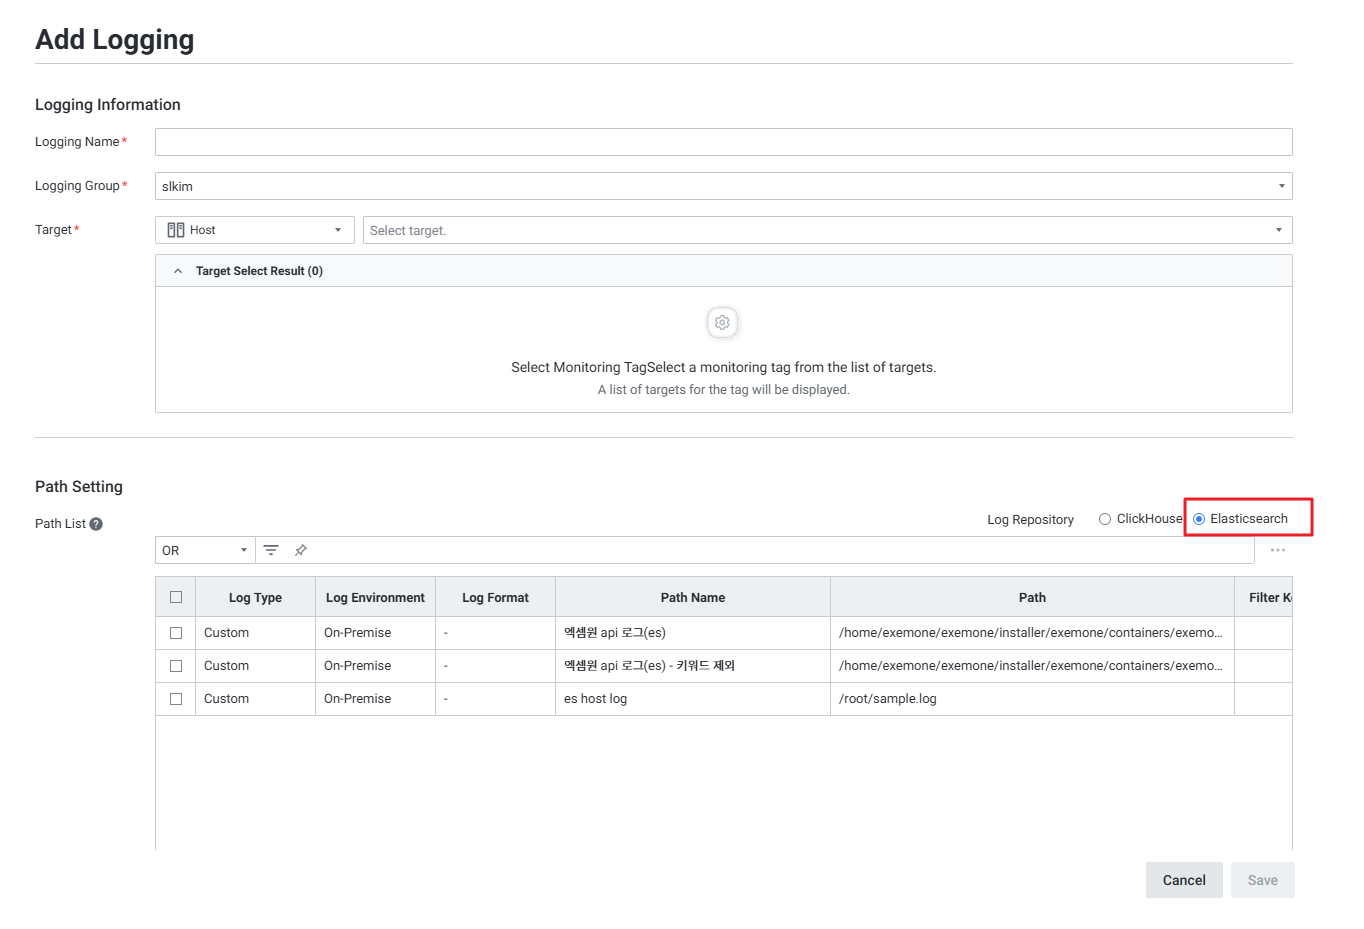
Setting > Log > Logging追加 メニューで:
- Add/Edit Logging > Path Setting >
Log Repository > Elasticsearchを選択
5. Elasticsearch外部リソースモニタリングターゲットの登録
Elasticsearch自体をモニタリング対象として登録することで、Dashboardでデータを照会できます。
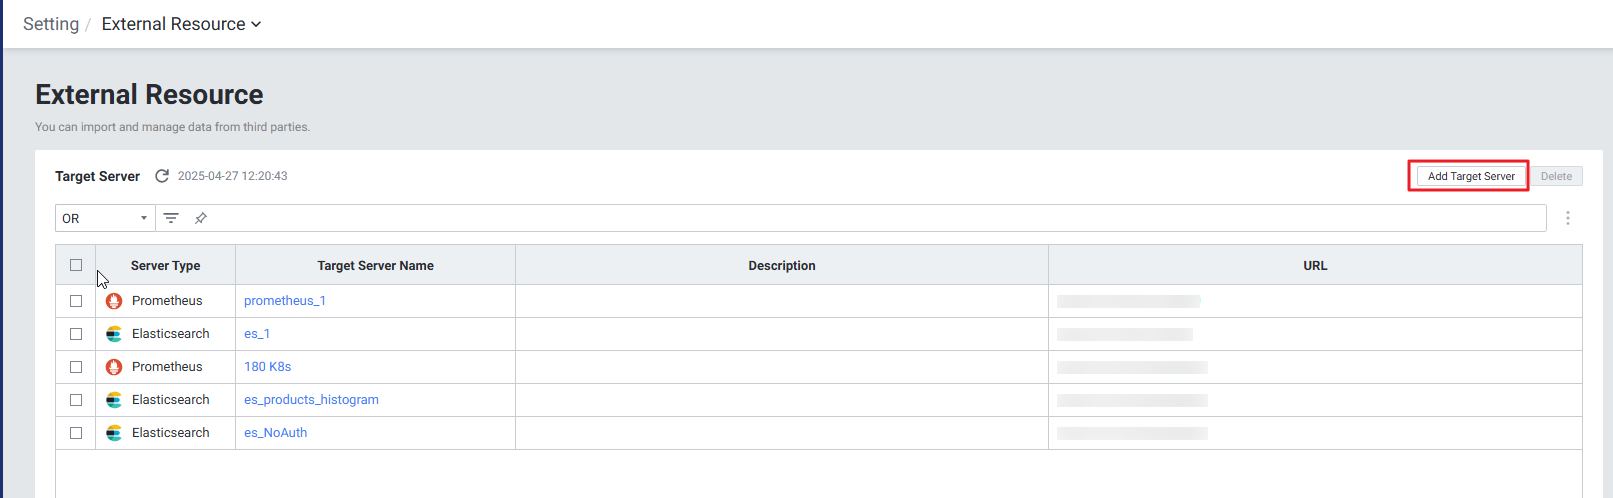
手順1: ターゲットサーバーの追加
Setting > External Resource > [Add Target Server] ボタンをクリック
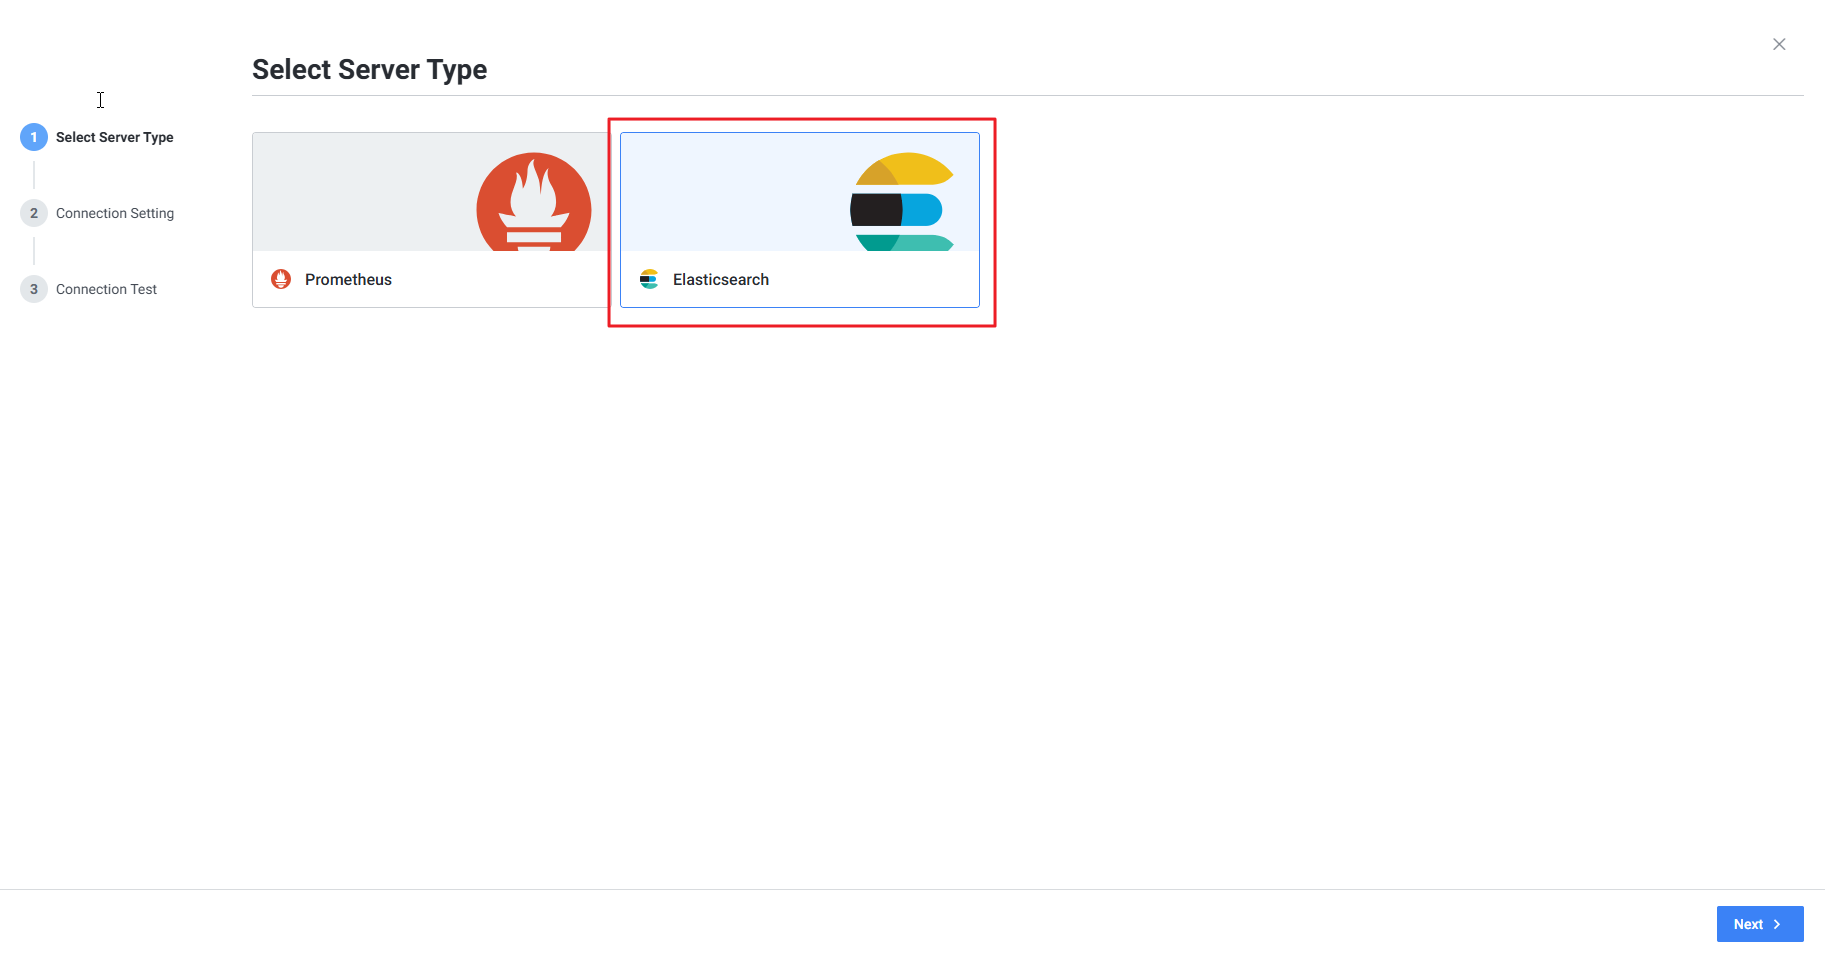
手順2: Elasticsearchの選択
手順3: 接続情報の入力
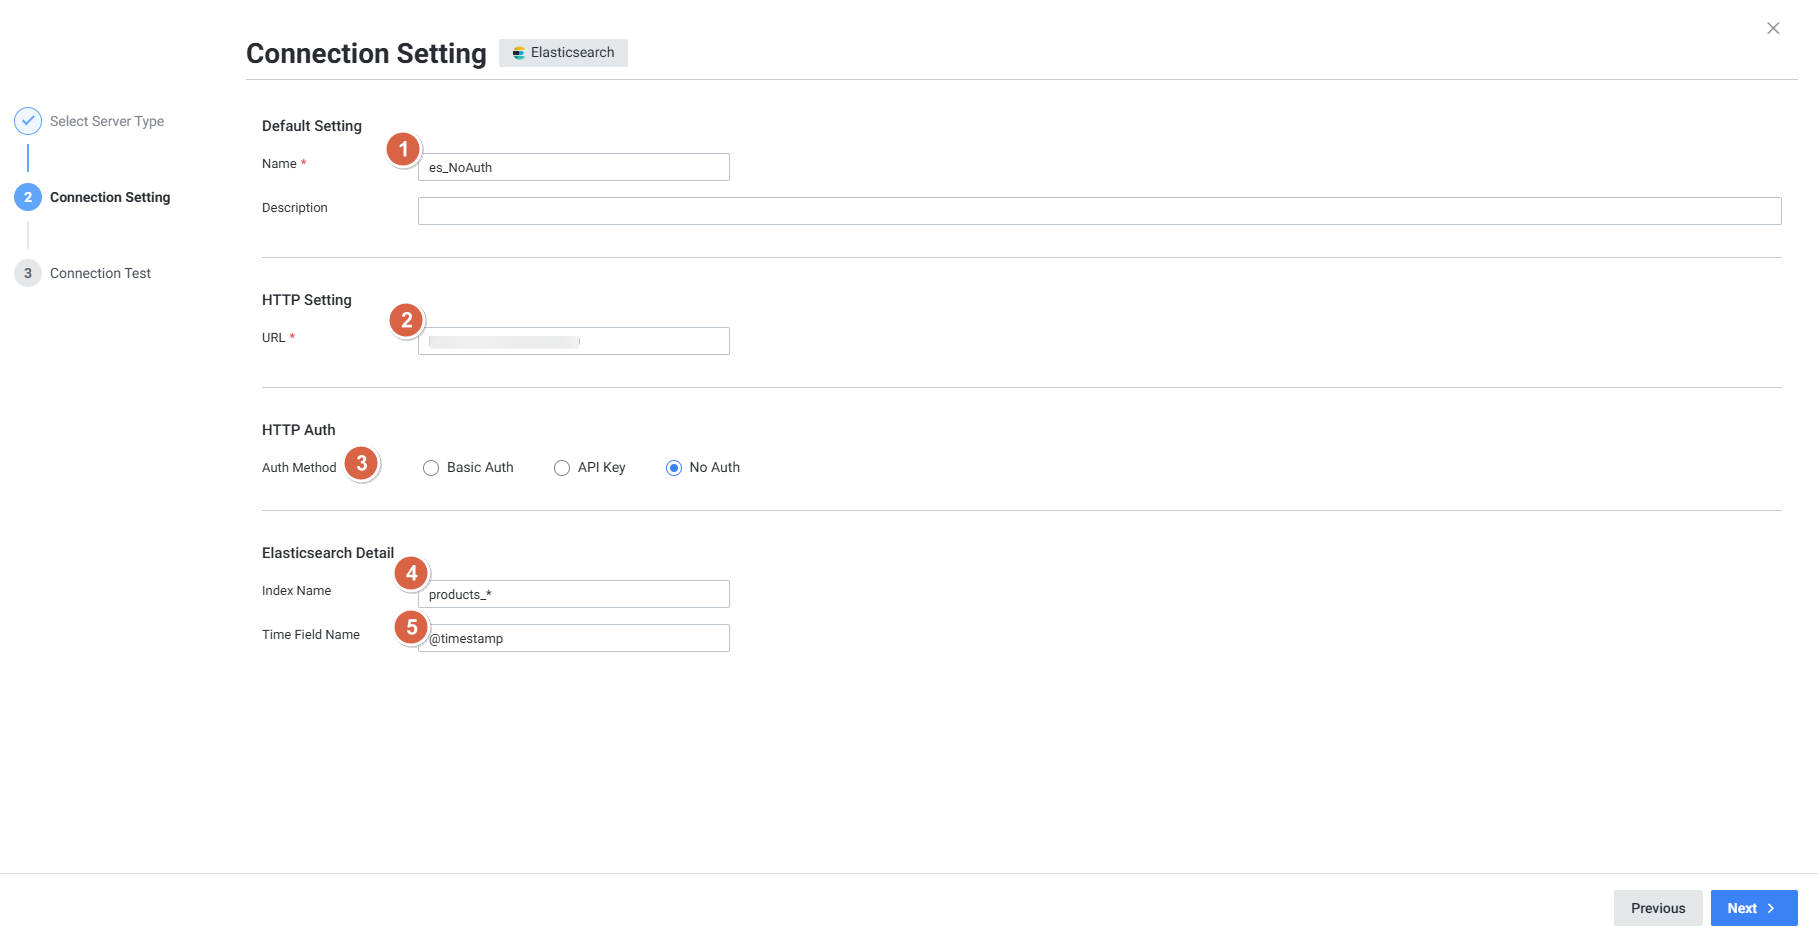
| 順番 | 項目 | 内容 |
|---|---|---|
| 1 | Name | ターゲットの別名を指定 |
| 2 | Description | ターゲットに関する説明を入力 |
| 3 | URL | Elasticsearch接続情報を入力 |
| 4 | Skip TLS certificate validation | TLS認証検証をSkipするかどうか |
| 5 | Auth Method | 認証タイプを選択 |
| 6 | Index Name | データを検索するIndex Name(正規表現可能) |
| 7 | Time Field Name | Time Fieldの名前を入力 |
6. インデックス保管周期の変更
手順1: 現在のポリシーの確認
# インデックステンプレートに適用されたポリシー確認
curl -X GET "http://<ip>:<port>/_index_template/exemone-log-v1?pretty"

# ポリシー保管周期確認
curl -X GET "http://<ip>:<port>/_ilm/policy/exemone-log-v1-policy?pretty"
手順2: ポリシーファイルの保存および修正
# 結果をファイルに保存
curl -X GET "http://<ip>:<port>/_ilm/policy/exemone-log-v1-policy?pretty" -o policy.json
ファイルから "policy" の値のみを残し、in_use_by、version、modified_date などを削除します。delete 段階の min_age の値を変更します:
{
  "policy" : {
    "phases" : {
      "hot" : {
        "min_age" : "0ms",
        "actions" : {
          "rollover" : {
            "max_age" : "1d",
            "max_size" : "25gb"
          }
        }
      },
      "delete" : {
        "min_age" : "30d",
        "actions" : {
          "delete" : {
            "delete_searchable_snapshot" : true
          }
        }
      }
    }
  }
}
手順3: 変更の反映および確認
# ポリシー反映
curl -X PUT "http://<ip>:<port>/_ilm/policy/exemone-log-v1-policy" -H "Content-Type: application/json" -d @policy.json

# 変更確認
curl -X GET "http://<ip>:<port>/_ilm/policy/exemone-log-v1-policy?pretty"
7. インデックステンプレートの更新
現在のテンプレートの確認
# 使用中のテンプレート確認
curl http://localhost:9200/_cat/templates/exemone-log*

# テンプレート詳細情報照会
curl http://localhost:9200/_index_template/exemone-log-v1?pretty

テンプレート更新の実行
curl -X PUT http://localhost:9200/_index_template/exemone-log-v1 -H 'Content-Type: application/json' -d @<업데이트 파일>.json
新規インデックスへの適用(rollover)
更新されたインデックステンプレートは、新しく作成されるインデックスからのみ反映されます。
# rolloverで即時適用
curl -X POST "http://localhost:9200/exemone-log-v1/_rollover"

# 新しく作成されたインデックス確認
curl "http://localhost:9200/_cat/indices/exemone-log-v1*?v&s=creation.date:desc"
注意事項
- Elasticsearchバージョン: exemONEは8系以上のみサポートします
- SSD推奨: Elasticsearchの公式推奨はSSDであり、HDD環境でも動作しますが、性能が低下する可能性があります
- メモリ設定: JVMヒープメモリは、使用可能な物理メモリの半分に設定します
- インデックスパターン: exemone-ingesterで使用するインデックスパターンは
exemone-log-v1*であり、テンプレート名はexemone-log-v1-templateです - データ特性: External Resourceとして登録したElasticsearchモニタリングはリアルタイムの揮発性データを出力し、データを別途保存しません
- root実行不可: Elasticsearchはセキュリティ上、rootユーザーで直接実行できないため、別のユーザー(例:
exemone)で実行する必要があります
参考ドキュメント: